
Recently, I did a maintenance of my 3d printer (Ender 3 Pro) and I wanted for a long time to try Klipper as I have a Raspberry Pi with OctoPrint on it. I wanted also to remove the USB cable I use to connect the pi and the printer main board : the thing is that I couldn’t use the TFT port of the motherboard because there was the touchscreen using it. For fixing all of that, I saw that Klipper can have a better web UI and also we can attach directly a touchscreen to the pi to control Klipper. This article is just a summarized of what I found (videos, text) on Internet and applied to my printer through trial and error.
Installing Klipper
On the Raspberry Pi
I did the complicated way of backing up my current octopi then I installed a fresh Raspbian on the SD card. On the new installation, I used kiauh to install Klipper, Moonraker and Mainsail. I, then, copied this example config as I have a SKR Mini E3 V2.0 as main board.
Building the firmware for the main board
In SSH shell on Pi, write :
1
2

cd ~/klipper
make menuconfig
I did setup the mainboard to my SKR Mini E3 V2.0 (on the example config, you have a small header explaining what to enter). It should open a menu (like below) and enter the same value (it will makes the firmware “listen” on the TFT port) : 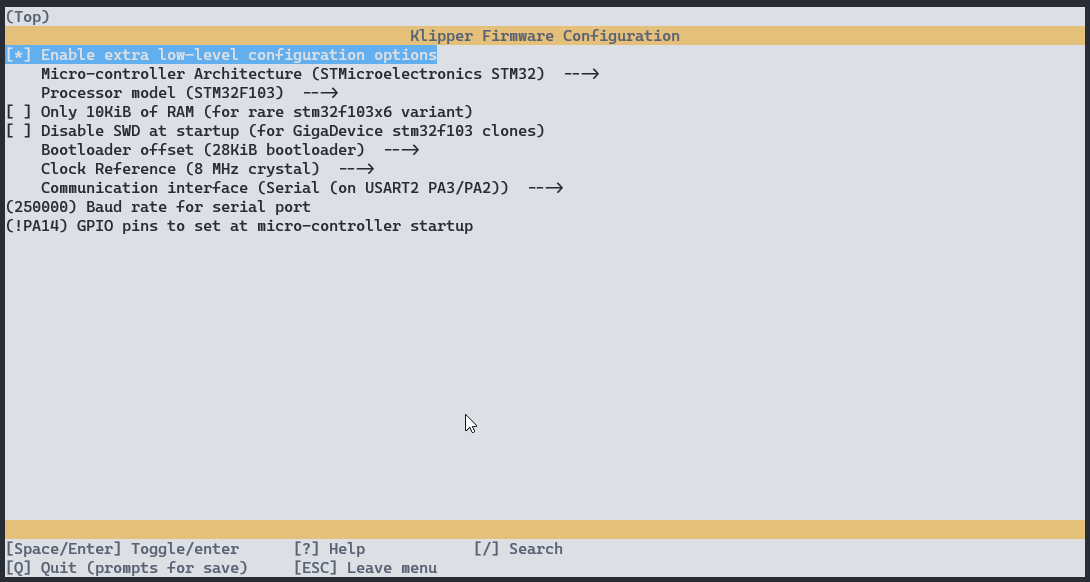
Then run :
1

make
When it’s compiled, just copy the klipper.bin file from the pi to another sd card that you insert on the main board and boot it up : it gonna update and install the new firmware.
Configuration
Main board connection
1
2
3
4

[mcu]
serial: /dev/ttyAMA0
baud: 250000
restart_method: command
Using vanilla lcd until KlipperScreen (I need a touchscreen)
I copied the configuration example and removed everything except :
1
2
3
4
5
6
7
8
9
10
11
12
13
14
15
16
17
18

######################################################################
# 128x64 Full Graphic Creality CR10 / ENDER 3 stockdisplay
######################################################################

# This section is used for a Creality "12864" display with a single
# ribbon cable between the display's EXP3 plug and the
# micro-controller board's EXP1 connector.

[display]
lcd_type: st7920
cs_pin: EXP1_7
sclk_pin: EXP1_6
sid_pin: EXP1_8
encoder_pins: ^EXP1_5, ^EXP1_3
click_pin: ^!EXP1_2

[output_pin beeper]
pin: EXP1_1
BL Touch + Bed Mesh
1
2
3
4
5
6
7
8
9
10
11
12

[bltouch]
sensor_pin: PC2
control_pin: PA1
x_offset: -43.0
y_offset: -13.0
samples: 3

[safe_z_home]
home_xy_position: 117.5, 117.5 # (nozzle in middle of the bed)
speed: 50
z_hop: 10
z_hop_speed: 5
BL Touch’s Z offset is found and saved using Klipper building command.
1
2
3
4
5
6
7

[bed_mesh]
speed: 120
horizontal_move_z: 5
mesh_min: 15,15
mesh_max: 188,191
probe_count: 5,5
algorithm: bicubic
Mesh max is calculated from the max bed size - probe offset (to avoid getting an error of out of bound). After that, just probe the bed once, and save it to default.
Some useful macro for the slicer (based on Cura default for Ender 3 Pro)
1
2
3
4
5
6
7
8
9
10
11
12
13
14
15
16
17
18
19
20
21
22
23
24
25
26
27
28
29
30
31
32
33
34
35
36
37
38
39
40
41
42

[gcode_macro START_PRINT]
gcode:
  {% set BED_TEMP = params.BED_TEMP|default(60)|float %}
  {% set EXTRUDER_TEMP = params.EXTRUDER_TEMP|default(210)|float %}
  # Use absolute coordinates
  G90
  # Wait for bed to reach temperature
  M190 S{BED_TEMP}
  # Home the printer
  G28
  # Set and wait for nozzle to reach temperature
  M109 S{EXTRUDER_TEMP}
  # Start macro for cleaning up the nozzle
  CLEAN_NOZZLE

[gcode_macro CLEAN_NOZZLE]
gcode:
  G1 Z2.0 F3000 ; Move Z Axis up little to prevent scratching of Heat Bed
  G1 X0.1 Y20 Z0.3 F5000.0 ; Move to start position
  G1 X0.1 Y200.0 Z0.3 F1500.0 E15 ; Draw the first line
  G1 X0.4 Y200.0 Z0.3 F5000.0 ; Move to side a little
  G1 X0.4 Y20 Z0.3 F1500.0 E30 ; Draw the second line
  G92 E0 ; Reset Extruder
  G1 Z2.0 F3000 ; Move Z Axis up little to prevent scratching of Heat Bed
  G1 X5 Y20 Z0.3 F5000.0 ; Move over to prevent blob squish

[gcode_macro END_PRINT]
gcode:
  # Turn off bed, extruder, and fan
  M140 S0
  M104 S0
  M106 S0
  # Move nozzle away from print while retracting
  G91
  G1 X-2 Y-2 E-3 F300
  # Raise nozzle by 10mm
  G1 Z10 F3000
  G90
  # Present the print
  G1 X0 Y235 F3000
  # Disable steppers
  M84
Misc
1
2
3

# Pi Temperature
[temperature_sensor pi]
sensor_type: temperature_host
Increasing the print speed for free (printer goes brrrrrrr)
To make the printer goes as fast as it can be, with reduced artefact and no layer shifting, there is the feature named input shaping. With that test print, you find manually your printer resonance and also your max printer acceleration speed.
My config goes like this :
1
2
3
4

[input_shaper]
shaper_freq_x: 38.4615
shaper_freq_y: 48.5437
shaper_type: 3hump_ei
It’s a pretty amazing feature as you can see your printer going faster while maintaining a good print quality.
Next upgrades I plan to add (for Klipper)
- A BTT PI TFT Touchscreen
- Accelerometer to automate the resonance compensation